LF: Tree perch in/around Michigan

Lapis

New member
Aug 9, 2016
28
0
Parrots
Female Violet IRN, Nyla / Female TAG, Izumi
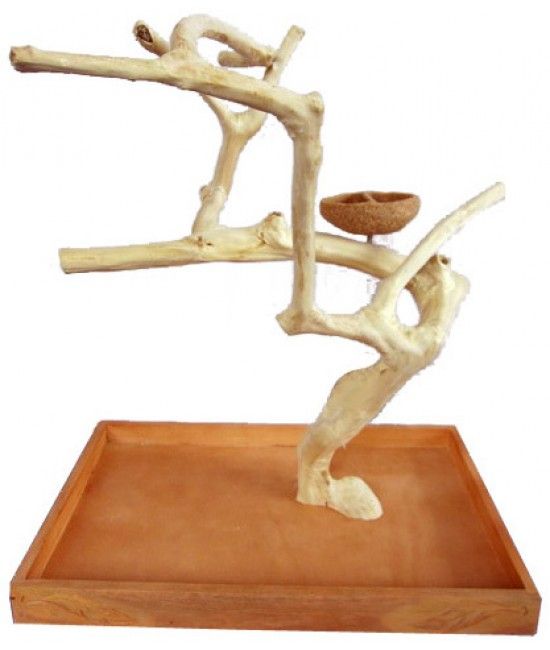
Something like this:

java_wood_tree_bird_playstand-550x650.jpg


I have an IRN so it doesn't need to be HUGE :p I can pay for shipping if it's too far out of state. I'm looking for a good deal on one.. somewhere around $100/$150

if anyone has links to retailers as well I'd love to take a look ^_^
 

itzjbean

Well-known member
Jan 27, 2017
2,572
Media
4
119
Iowa, USA
Parrots
2 cockatiels
I found this on Amazon It's only $86 and has good reviews, although most say it is medium size and may be a little big for your IRN.

This one on Wayfair may be more your IRN's size, and only $56. Hope that helps! I would check to see when the next bird show/fair is in your area too, they often have tree stands like the one you're looking for and you can get good deals on them.
 
Last edited:

SailBoat

Supporting Member
Jul 10, 2015
17,662
10,048
Western, Michigan
Parrots
DYH Amazon
Tough price range for new.

If you or a friend are at all handy with tools, this is a very easy DIY project. Fairly standard power and hand tools, a few nails and screws, and some cut lumber.

The South 3/4's of lower Michigan is void of snow cover and finding a twisted branch that will meet your needs is about as easy as a couple /three walks in the Woods.

Once you have the twisted branch (try to find a hard wood and cut if from the tree). Clean the twisted branch of its bark, wash, dry, and sand lightly.

Create the base so that it is slightly larger that the expanse of the twisted branch. Drill a hole in the base the same size of the screw and screw the twisted branch on the base.

Search the end-cut (scrap) bin at your local big box store and you will keep your costs well under your budget.

Have Fun!
 
Last edited:
OP
Lapis

Lapis

New member
Aug 9, 2016
28
0
Parrots
Female Violet IRN, Nyla / Female TAG, Izumi
  • Thread Starter
  • Thread starter
  • #4
Doesn't need to be new, but thanks you two ^_^
I was thinking about doing a DIY if I couldn't find one with a decent price :p
 

EllenD

New member
Aug 20, 2016
3,979
65
State College, PA
Parrots
Senegal Parrot named "Kane"; Yellow-Sided Green Cheek Conure named "Bowie"; Blue Quaker Parrot named "Lita Ford"; Cockatiel named "Duff"; 8 American/English Budgie Hybrids; Ringneck Dove named "Dylan"
I was going to comment as Sailboat already has, to say that I have made MANY of these and they are very easy to make and they cost me under $20 each, regardless of size. I'm pretty handy and have extensive tools, but I wouldn't need to be very handy at all to make these, and you need only basic tools.

"WOODEN BRANCH PLAYSTAND DIY FOR UNDER $20"

PART #1:

As far as tools, you'll need a power drill (doesn't have to be very powerful, you're only drilling a small hole in the bottom of the branch and the wooden base for wood screws), Phillips and flathead screwdrivers, and a hammer or rubber mallet. You'll need either a sanding block (easiest) or sandpaper to prep and shave/strip the branches you've gathered. You need some nails of various sizes to secure the branches to the base. You'll need a strong Epoxy (Gorilla Glue Epoxy is awesome; don't worry, this is only used sparingly for one step and it's placed inside the trunk so your bird will not have access to any glue at all) and either an Xacto knife or better yet a Dremel Rotary Tool works perfectly and quickly, if you're planning on using more than just one large branch, but rather want to attach smaller, accessory branches. I typically buy the stainless steel food bowls at Petco, and they come with their own metal holder and hardware that will attach to your outer branch limbs.

I usually make tabletop branch perches just like the one's your looking at. They are tall and wide, but not huge (I made one for my Senegal Parrot recently, so this size should be correct for an IRN as well). The bases you typically see like the one above can be purchased at Walmart, in several different sizes, woods, and finishes, already built and ready to go!!! If you go to any Walmart and go to the 2-3 aisles for arts and crafts, one of the aisles is all wooden boxes, crates, stencils, etc. They have wooden bases just like the base for this playstand in their craft section, I'm not really sure what they are actually meant for but when I happen to see them about a year ago I was like "Well, I won't have to measure, cut, and nail the bases anymore!" As I said, they have several different sizes, woods, and finishes available, I typically buy a raw, unfinished pine base box and finish/paint it myself. For a tabletop play stand like this one being made for my Senegal Parrot or an IRN, they have one that is 12"x12", and they also have one that is a couple inches wider, like 13.5"x13.5", the choice is yours. But I will tell you that I go to Walmart first and buy the base because after choosing the base I've pretty much decided what the size is going to be, and then I can properly choose my branch or branches to make the stand size proper for the base. These wooden box bases cost anywhere from $5-$15 at Walmart, the unfinished pine one that is a bit larger than a square foot is the one I typically buy for my medium/large tabletop stand, at this base costs $8.99 I believe. They also have much larger wooden crate bases and individual sides to make bases from if you're building a very large, standing or rolling playstand. You can obviously build your own base from (4) 2x4's and a sheet of either plywood or nicer wood if you have it laying around, but buying the lumber to actually build a base will cost more, take up more time, and in my opinion not look as nice or as professional as these already-built crate bases that Walmart sells. I leave my wooden branch playstands natural and unfinished, so using one of these pre-manufactured bases just makes it look better, and for $5-$10 it's already made. Your choice.

Next is picking your branch or branches. If you're as lucky as I am to live in an area that is heavily wooded (I'm in central PA), then finding a really cool branch or branches is pretty easy. You can also order them online if you want a particular type of wood, but you obviously save a fortune if you actually go out to the woods, or the beach if able (driftwood works well), and then prepare, clean, and shape the branches yourself.... THEY'RE FREE!!! I typically try to find one branch, but if I can't find one single branch that works well, then I'll look for two or three that I can visualize integrating well together. As long as the bases of each branch are wide enough and thick enough in diameter to attach to each other, or a single branch is wide/thick enough to firmly attach to the base box, then you're good. The one I made for my Senegal has one large branch that comprises about 85% of the stand, and then I added two other much smaller branches, one on each side of the main branch, to add some variation in climbing areas. This is why I chooses to make my own, you not only save a fortune but you get to create your own unique designs and customize the stand for your bird and what you think he'll like.

The longest step in building one of these (after you've found your branches) is prepping and cleaning the wood. I first peel any and all bark off of the branches by hand and then use a carving knife to shave EVERY part of each branch down to fresh, bare wood. I have a lot of small/tiny knives and files because I restore guitars, but just a standard carving knife to shave all of the outer bark and junk off the outside and then an Xacto knife to get to small crevices and knots clean. Once each branch is completely clean and down to all fresh, bare wood I then clean the wood. Some people use chemicals or oils, I don't like using anything like that. I just use very hot water and soak the branches for about an hour. Then I rinse them again in hot water, put them on a baking sheet, and I bake them at 425 degrees for at least an hour, though it usually it takes longer because you want the branches completely dry. This baking step not only dries the branches out but it also sterilizes them and kills any bacteria, fungus, parasites, etc. that may be on/inside the wood. It also tends to darken the wood up a bit. I know people that put different chemicals, glazes, oils, etc. on the branches either just before baking them or directly after to make the wood look a certain way. I don't do this because I don't want my birds chewing on chemicals. There are natural oils you can rub into the wood after you bake it to make it look nice, up to you, but remember that most wood is very porous and anything you put on the wood is going to be absorbed into the wood, and your bird is going to be standing on this wood and more importantly chewing on it. So make sure that any cleaners, chemicals, oils, paints, glazes, finishes you put on the branches or the base is non-toxic. You're better to use nothing.

After I am sure that I've baked all of the water out of the branches and they're completely dry, I take them out of the oven and let them cool. After they're cool I typically sand them down with a sanding block by hand until they are very smooth, wipe them down with hot water (not soaking them, although you can if you want to be extra safe), and then I bake them again for another hour. You really can't bake the branches too much, it's only going to ensure that there are no parasites, bacteria, or fungi on or in the wood. Now if you soak the wood a second time then you must once again make sure it's 100% dry, if you just wiped it down after sanding then it won't be very wet. I still like to bake it for another hour. Then I let them cool again. Now you're ready to build your stand.

I have my design sketched out prior to building the stand, that way I can cut, trim, and shape my branches prior to attaching them to each other. I start by securing the largest branch to the wooden box base. If you were lucky enough to find a single branch to make your playstand out of then you only have one branch to attach. If you're using multiple branches it's your choice whether you want to attach the large branch to the base and then attach your smaller branches, or whether you want to attach the smaller branches to the large branch and then attach the entire thing to the base. Some people like to nail the base to the large branch, some like to drill and screw (only doable if the large branch is wide enough). I typically use several nails (as many as I can use, usually 4 nails for the base) and I hammer them up through the underside of the base into the large branch, which is centered on the top side of the base. Then flip it over and you basically have your play stand! I try not to use any glues because they are toxic, and I find that you don't need glue if you use 3-4 nails to attach the base to the large branch. Use the longest nails you can use, obviously without having the nails come through the sides of the large branch.

Once I have the large branch nailed to the base I then connect any smaller branches to the large branch, if I'm using them. I try not to, but as I said I just made one that had 2 accessory branches added to the large branch, one on each side. This is probably the most difficult part of building one of these because the accessory branches are much smaller, or skinnier, and harder to firmly attach to the larger branch. I always find accessory branches long enough that I can attach them to the main trunk of the large branch for stability, rather than trying to attach small branch to small branch, which will most likely not be sturdy enough for a larger bird to sit on. I also try to collect accessory branches that may have many smaller arteries but always have a wider, thicker main trunk.

CONCLUSION IN FOLLOWING POST!!!

Sent from my XT1575 using Tapatalk
 
Last edited:

EllenD

New member
Aug 20, 2016
3,979
65
State College, PA
Parrots
Senegal Parrot named "Kane"; Yellow-Sided Green Cheek Conure named "Bowie"; Blue Quaker Parrot named "Lita Ford"; Cockatiel named "Duff"; 8 American/English Budgie Hybrids; Ringneck Dove named "Dylan"
"WOODEN BRANCH PLAYSTAND FOR UNDER $20 DIY"

PART #2:

Now you don't want an exposed screw or nail that your bird can chew on or pull out, so usually what I do is attach any smaller branches to the trunk of the large branch BEFORE I attach the large branch to the base. I typically use an Xacto knife to chisel out holes or notches in the main trunk of the large branch for the accessory branches to fit into. Always start small with the hole/notch and very gradually enlarge it until you are able to just barely insert the main trunk of accessory branch into the hole opening. That's your hole diameter and shape. Then I'll keep the hole the same shape and diameter but make the hole as deep into the trunk of the large branch as I can for stability. This is the only step I use glue for because it will be inside the branch and will not be exposed to the birds at all. I put a very small amount of strong epoxy, usually Gorilla Glue Epoxy (the kind where the two tubes of epoxy mix together as they exit their respective tubes, as you push on the plunger) down into the hole in the trunk of the large branch. It doesn't take much at all if you're using the Gorilla Glue Epoxy, it's very strong stuff. Once I put the Epoxy down in the hole I've made I insert the trunk of the accessory branch into the hole by hand as far as I can. Just to state the obvious, I make the holes in the trunk of the large branch that the accessory branches fit into VERY SNUG/SMALL on purpose. Once I insert the accessory branch as far as I can by hand I use a rubber mallet to hammer the accessory branch into the hole as far as it will go. Use a rag soaked in hot water to wipe away any Epoxy that may leak out around the hole and onto the accessory branch as soon as you hammer the accessory branch in. I typically make all of the holes in the trunk of the large branch for all of my accessory branches first, then add Epoxy and fit them by hand, then hammer them in and clean up the Epoxy one by one, in that order. Then let your stand sit and dry for about 15-20 minutes. While it's drying you can decide where you want to place your food bowl. Now again, I take the easy road on this step and simply buy a stainless steel food bowl from Petco, and use the mounting ring it comes with to attach it to the branch of my choosing. This makes it very easy to just remove the bowl from the ring to dump it, fill it, and clean it, and I just leave the mounting ring attached to the stand. You can get fancy if you want to and build food bowls into the branches a million different ways, but this is easiest, cheapest, and quickest. I think these bowls cost between $5-15 depending on what size you choose.

After your play stand has dried you may have some Epoxy that has dried on the accessory branches and/or the large branch trunk. If so, you'll want to sand ALL OF IT OFF so your bird can't chew at it, as it's toxic. So either use your sanding block and do it by hand, or a much quicker way to not only sand off the excess dried Epoxy but also any remaining bark is to use a Dremel Rotary Tool with a sanding attachment. I also at this point will use my Dremel to sand any rough spots on the trunks, the branches/limbs, any pointy ends and sharp edges, and to shape and/or reshape any branches I want to for my design.

That's about it, you're done! I leave my stands bare and unfinished. I've seen some wooden stands sealed, painted, varnished, you name it, but you can bet that your bird is going to chew and use their beak on every part of their stand, so I prefer to leave it as bare, natural wood. If it's a tabletop stand I'm done, but I have made a few HUGE wooden stands that were between 4'-6' tall, and I attached locking casters to the bottoms of the stands of any of the larger floor stands I've made. Again Walmart sells individual casters that come with 2 screws and nuts to attach the casters to the base. In this instance you'll need to drill 2 holes through the base at all 4 corners and use your screwdriver to tighten the screws of the casters to the base. Easy. I think these individual casters with their hardware included cost $2 at Walmart, are located in the Hardware aisle with all the nuts and bolts, over by the Tool aisle, and they come in a couple of different colors of metal. accessory branches and/or the large branch trunk. If so, you'll want to sand ALL OF IT OFF so your bird can't chew at it, as it's toxic. So either use your sanding block and do it by hand, or a much quicker way to not only sand off the excess dried Epoxy but also any remaining bark is to use a Dremel Rotary Tool with a sanding attachment. I also at this point will use my Dremel to sand any rough spots on the trunks, the branches/limbs, any pointy ends and sharp edges, and to shape and/or reshape any branches I want to for my design.

That's about it, you're done! I leave my stands bare and unfinished. I've seen some wooden stands sealed, painted, varnished, you name it, but you can bet that your bird is going to chew and use their beak on every part of their stand, so I prefer to leave it as bare, natural wood. If it's a tabletop stand I'm done, but I have made a few HUGE wooden stands that were between 4'-6' tall, and I attached locking casters to the bottoms of the stands of any of the larger floor stands I've made. Again Walmart sells individual casters that come with 2 screws and nuts to attach the casters to the base. In this instance you'll need to drill 2 holes through the base at all 4 corners and use your screwdriver to tighten the screws of the casters to the base. Easy. I think these individual casters with their hardware included cost $2 at Walmart, are located in the Hardware aisle with all the nuts and bolts, over by the Tool aisle, and they come in a couple of different colors of metal.

Obviously there are a million design possibilities to these wooden playstands, just like the PVC playstands and bird gyms, which I also make and actually enjoy making more than the wooden branch playstands because the PVC gyms can literally take up an entire room if you want them to! The PVC playstands and gyms are also fun to make because I usually don't have a sketch drawn prior to the start of construction, I typically just make the design up as I go along. Either way you decide to go you'll be saving a small fortune. People actually build these wooden branch playstands and the PVC pipe playstands for under $20, sometimes under $10, and sell them on eBay, Amazon, and Etsy for hundreds!


Sent from my XT1575 using Tapatalk
 
Last edited:
OP
Lapis

Lapis

New member
Aug 9, 2016
28
0
Parrots
Female Violet IRN, Nyla / Female TAG, Izumi
  • Thread Starter
  • Thread starter
  • #8
Thanks a lot!! I'll definitely give this a shot this weekend :) I have a handy friend who is willing to help, too!

Thanks again!
 

Most Reactions

Latest posts

Top