Sorry, I didn't manage to get the vetwrap with all the Christmas things that needed done. I'll be getting it this afternoon.
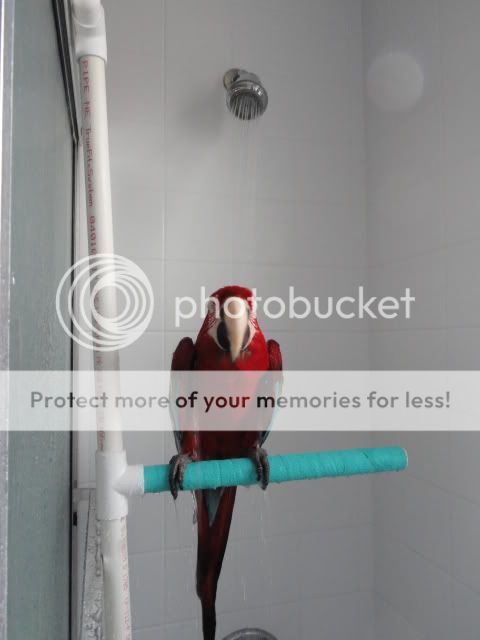
I can give some instructions in the meantime. I used 3/4" CVPC as I figured the diameter would be even wider once I add the vet wrap. I also wanted him to be able to hold on tightly. I was able to make the entire thing out of one 10' piece. You will also need cement for it, which you can buy in the same area of the store as the pipe. I didn't bother with the pipe cleaner or primer as it's not actually being used as plumbing. You will want a light grade sandpaper like 220 grit to sand the ends that are being glued together. To cut it you will need either a pipe cutter made for plastic or you can use a power miter saw. Chances are one of your neighbors have these things if you don't. A hand held plastic cutter can be bought for a few dollars though. It will also be in the plumbing section.
I first cut 2 2' long pieces for the long sides. I then cut a 1' cross piece to add stability, then a 1' piece for the main front perch. The 2 side perches are 7" long each. To reach over the top of my shower wall, I needed 2 3" pieces. The remainder of the pipe I cut in half to be the pieces that go down the back of the shower wall to hold it all in place. They are probably longer than they needed to be at around 14" each, but stability is good, right?
To make one like mine you will need 8 90 degree elbows plus 2 3 way joints to add the cross bar.
I next cut my 2 2' long pieces about 8" down to add the cross bar. Now don't forget to sand all the ends that will be glued.
Now it's time for gluing them all together. Put down a garbage bag or something to protect your floor or table or wherever you are putting this together. You will drip cement and it's nasty stuff. You will want to work fairly quickly. Put it all together in a dry run first if you want to practice. The glue can be moved for a short time while you are working if pieces are not quite in the exact place and need a bit of adjustment.
I first glued in the 3 way joints on my 2 2' sides. Then I added the cross bar, first to one and then to the other. I checked it for flatness. Next I added the 7" side perches to the bottoms of those 2 long sides. Then I added the 12" front perch that connects it. Here is where you want to work quickly to make sure that is all nice and square and fits together well. Next I added the 2 3" pieces at the top that will allow it to go over my shower wall. Last I put the 2 14" back pieces on the ends of the 3" pieces.
I would then let it dry for a full 24 hours. You will need to prop it up against something while it dries, with the garbage bag under it in case of errant drips.
I would wear some disposable gloves while you are gluing it all together. If you don't, hot soapy water will go a long way toward loosening the glue blobs on your hands and then you can peel it off. No matter how neat you are, you will get glue on your hands, lol! I've done a lot of plumbing and I always do.
Once I get the vet wrap on this afternoon, I will post some pics of this for everyone. Vet wrap can be bought anywhere that sells supplies for horses. I will be getting mine at TSC. It comes in a variety of colors, only sticks to itself and is easy to stretch and put on neatly. It is about $3 a roll. I don't think my bird will have time in the shower to be picking it off, but once it gets icky down the road, it will be easy to unwrap and put on new stuff. Besides wrapping a wound on a horse, it works well on humans and other animals as well. You can use it to hold bandages in place without it pulling off hair. I used it to wrap up the kid down the road when he fell off his little motorcycle and had some nasty road rash on his arm, lol! With horses it is a necessity to keep around, but I'm almost out.
I have been told my bird does not like red. From what I've observed, he really likes purple so I'm hoping I'll find some that is purple. If not, I'll get whatever color I can that isn't red, lol!
")
 I can post to other forums, but not here.